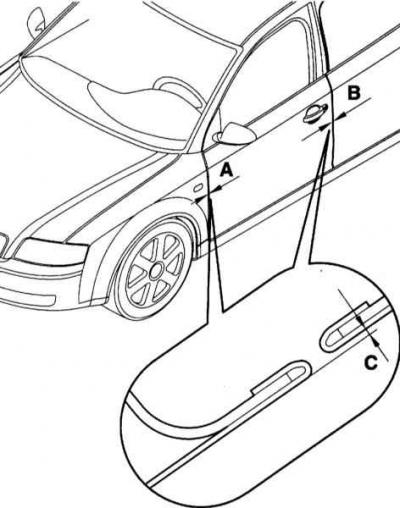
- A - 3.5±0.5 mm
- B - 4.5±0.5 mm
- C - 0±1.0 mm

Warning: Tailgate must be adjusted.
Check: Tailgate
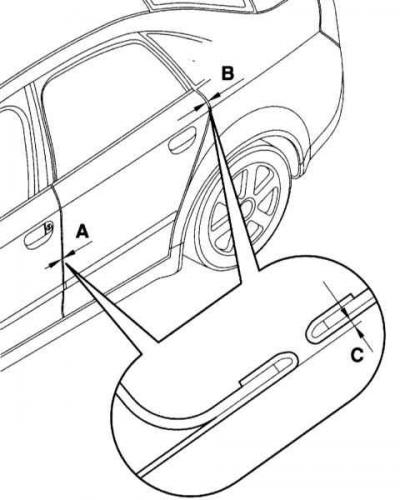
1. Check up gaps in pairing of a back door. The gaps must be uniform around the entire perimeter of the fit to the body.
- A - 4.5±0.5 mm
- B - 3.5±0.5 mm
- C - 0±1.0 mm

Warning: Tailgate must be adjusted.
Adjustment
1. Loosen the lock retainer screws.
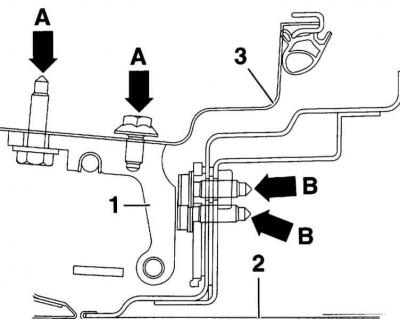
2. Adjustment of the door in the longitudinal direction: Loosen the screws fixing the hinges (arrows A) to the A-pillar (3) (tailgate: rack (IN) so that the door (2) with loops (1) could move in the grooves.

Warning: Some mounting screws are only accessible from the inside. To do this, you must first remove the bottom trim on the A-pillar or B-pillar. The accompanying illustration shows the bottom hinge with the door closed.
3. Adjustment of the door in the longitudinal direction: Align the door in accordance with the specified clearances and tighten the hinge fixing screws to the torque 32Nm.
4. Adjustment of the door in the transverse direction, 1 step: Loosen the hinge fixing screws (arrows B) so that you can move the door (2) with loops in grooves. Align the door so that its outline is flush with the adjacent bodywork. This applies primarily to the front of the door. At the rear, the door is adjustable with a latch lock. Screws of fastening of loops tighten the moment 32Nm.
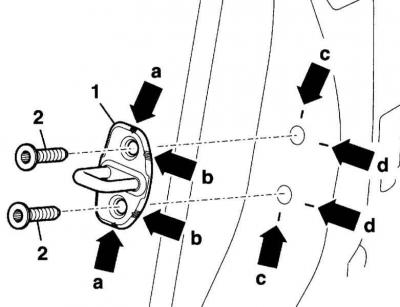
5. Adjustment of the door in the transverse direction, 2 steps: At the rear of the door, the adjustment is carried out by means of the lock catch (1).

Warning: Labels (a/c arrows) used for lateral adjustment, label (b/d arrows) for height adjustment.
6. Loosen the screws (2) and move the latch lock. Adjust the latch so that the door is slightly outward.
7. Carefully close the door so that it is flush with the adjacent bodywork and the lock latch engages properly in the lock.
8. Tighten the screws securing the lock retainer to the torque 25 Nm.

Visitor comments